products-tutorial

#All
Lens Cleaning for Longer B1 30W & 40W

Longer B1 30W & 40W has a laser module capable of engraving and cutting multiple types of materials. However, depending on the type of work that is carried out, it is possible that a fair amount of smoke is produced, which can inevitably settle on the lens of the laser module and therefore blur it. Once the lens of the laser module is dirty or clouded, the laser beam can no longer pass through it and therefore the emission of the laser module is drastically reduced. As a consequence, more and more power will be needed to engrave the same materials already engraved previously, until it will be practically impossible to engrave any type of material even setting 100% power. This problem occurs most when an air assist system is installed but not enabled; In fact, an Air Assist system allows you to create air pressure in the vicinity of the lens, thus preventing smoke and dust from settling easily on the lens. 

In order to solve this problem, it is necessary to proceed to cleaning the lens of the laser module; Once the lens is cleaned, the laser beam can pass through it without suffering losses and therefore the materials will be engraved or cut again to perfection. 


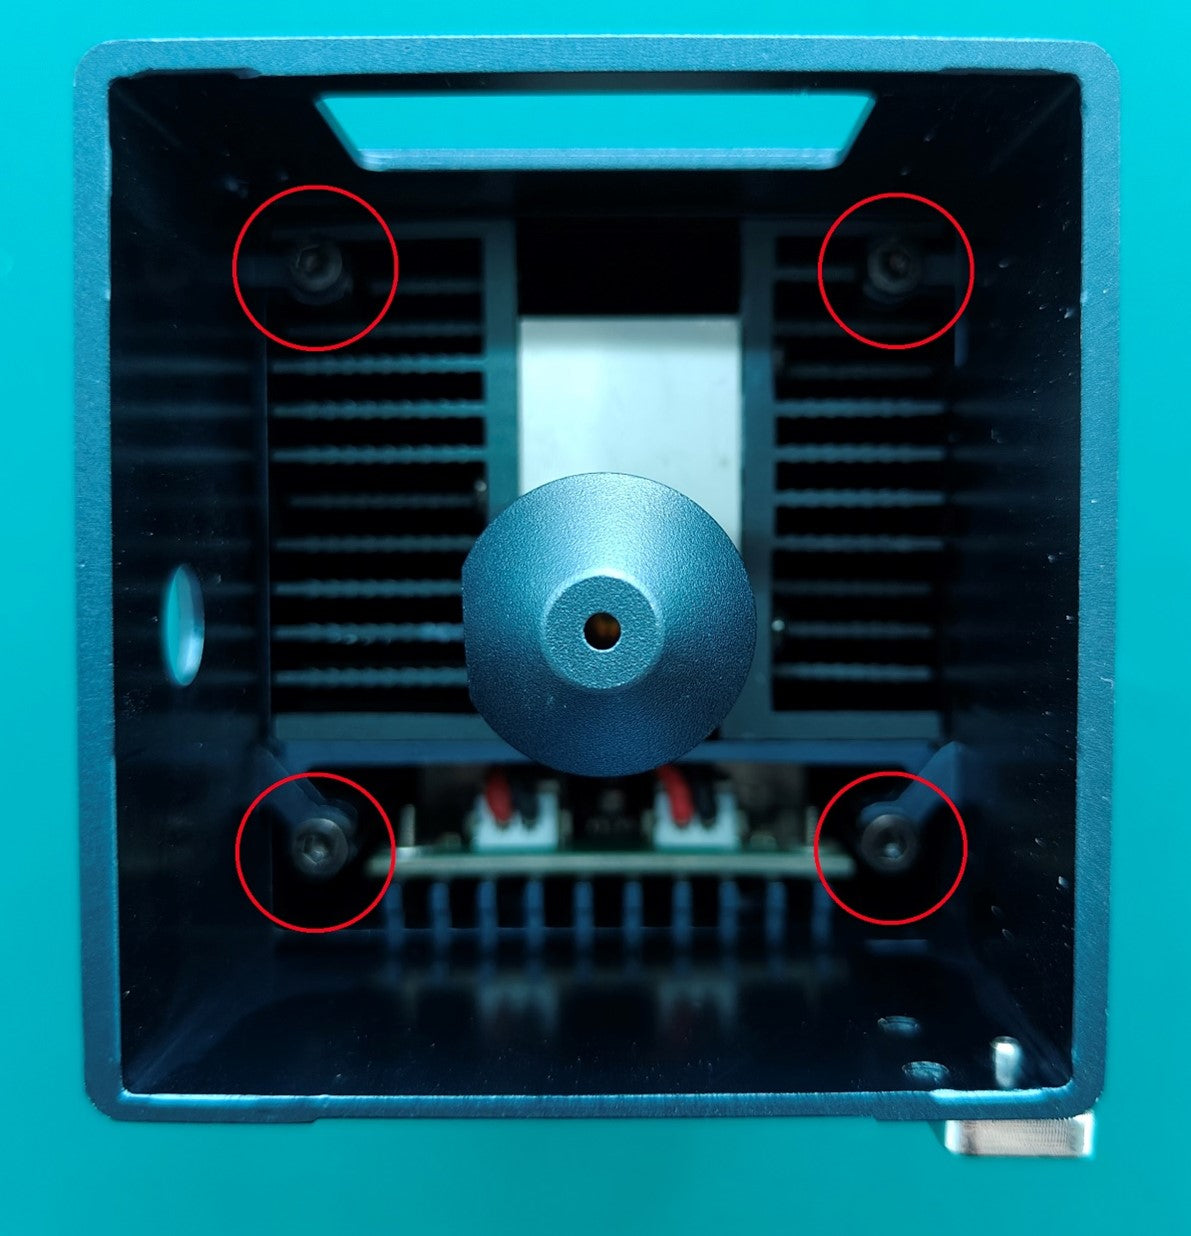
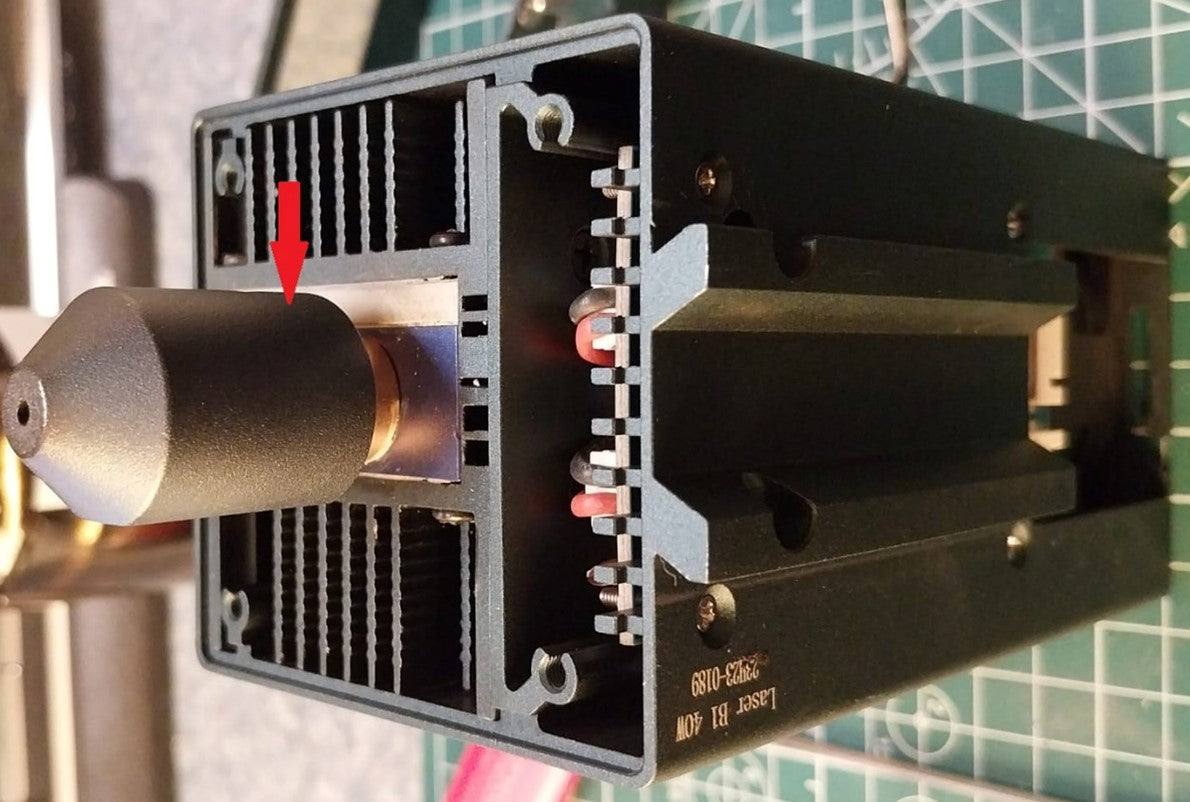
To proceed with the cleaning of the lens of the laser module of Longer B1 30W & 40W it is necessary first to completely disassemble the laser module. After separating the laser module from the rest of the machine, remove the four screws shown in the figure:

Once the four screws have been removed, the protective shield will be removed from the laser module, which will appear as shown in the figure. At this point, to remove the air assist nozzle, unscrew the small screw located on the side of the nozzle.

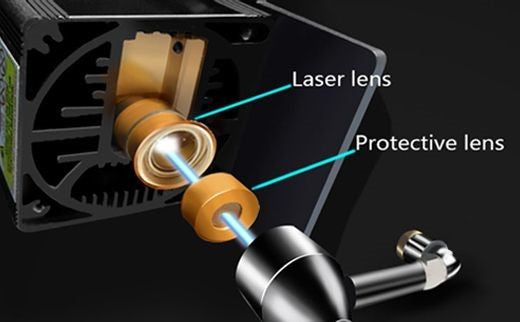
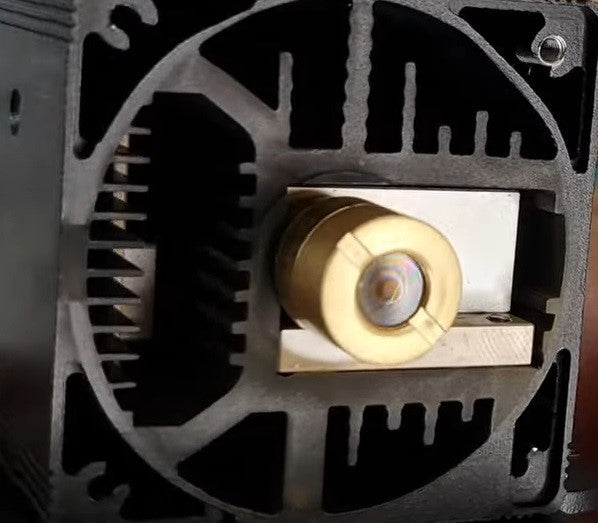
The laser module of the Longer B1 30W & 40W has a factory-installed protective lens, which can be unscrewed and cleaned separately from the laser module. This lens is a simple protective glass, and has no focusing function, for this reason it can be removed and cleaned/replaced. After removing the protective lens, you can proceed to clean the lens with the use of a cotton swab soaked in alcohol. Be careful to prevent alcohol from entering the inside of the lens. 

Use one or more cotton swabs soaked in alcohol, until the lens is completely clean and free of dirt; at this point, therefore, you can proceed to screw it to the laser module and reassemble the laser module of Longer B1 30W & 40W. At the end of the cleaning procedure, you can proceed to engrave a sample file contained in the microSD card of Longer B1 30W & 40W, so you can evaluate the total restoration of the functionality of the laser module. If the lens is too much dirty and cannot be cleaned, you can contact us for buying a replacement spare part. In order to keep the lens always clean, remember to keep enabled the air assist, this will help the engraving quality. 

By products-tutorial | May 15, 2024
Lightburn WiFi Bridge - Longer Ray5

Longer Ray5 adopts an MKS DLC32 mainboard, characterized by USB connectivity, wireless technology, microSD card reading, touchscreen display with graphic interface and total interaction with your smartphone through the MKSLaser application. 


The most common method of using Longer Ray5 is to connect the machine to your Laptop via a USB connection, or by exporting a gcode file to be run via the Longer Ray5 microSD. However, there is also an intermediate mode of operation, based on WiFi connectivity, which allows you to use Lightburn and Longer Ray5 without a USB cable. 


Connecting the Laptop and Longer Ray5 with a USB cable requires them to be within a short distance of each other, as the maximum extension of a USB cable is about 3 - 5 meters. On the other hand, connecting the Laptop with Lightburn and Longer Ray5 wirelessly allows you to position yourself at a greater distance, so as to obtain good greater security during the engraving process. For this reason, using Lightburn in WiFi mode offers numerous advantages in terms of security and efficiency, thus expanding the user's comfort and versatility of Longer Ray5. 


In order to connect Longer Ray5 and Lightburn wirelessly, you first need to complete the WiFi setup process on your Longer Ray5. To do this, proceed as follows. 

1.    Tap the tool icon on the touchscreen's home page

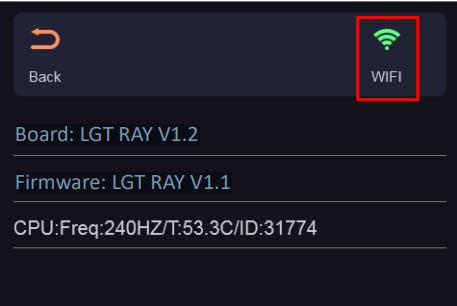
2.    Tap Wi-Fi icon on the top right corner of tool page

Tap the tool icon on the touchscreen's home page


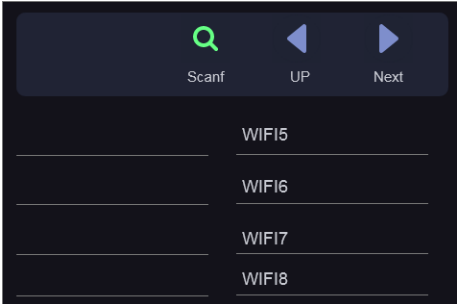
3. Select Wi-Fi name on Wi-Fi list page and enter password and waiting for connect to the WiFi Router/AccessPoint you selected

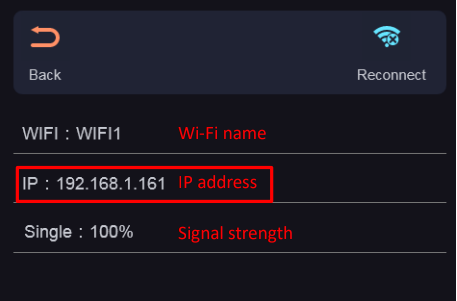
4. Check the current connected Wi-Fi status and take note of the IP address provided on the touchscreen

Once the Longer Ray5 has been successfully connected to the WiFi Router/AccessPoint and the IP address has been successfully provided and noted, proceed to open Lightburn on your Laptop. At this point, proceed as follows. 

1. Connect your Laptop to the same WiFi Router/AccessPoint to which you have connected Longer Ray5

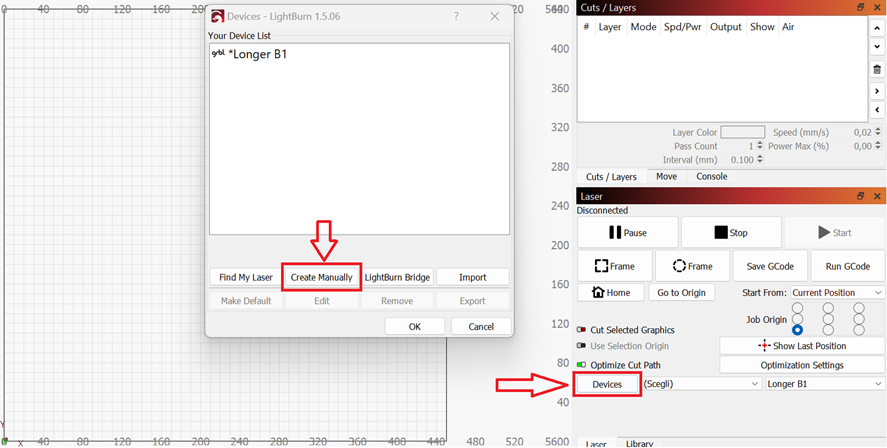
2. Click on "Devices", then click on "Create Manually" to add a new device

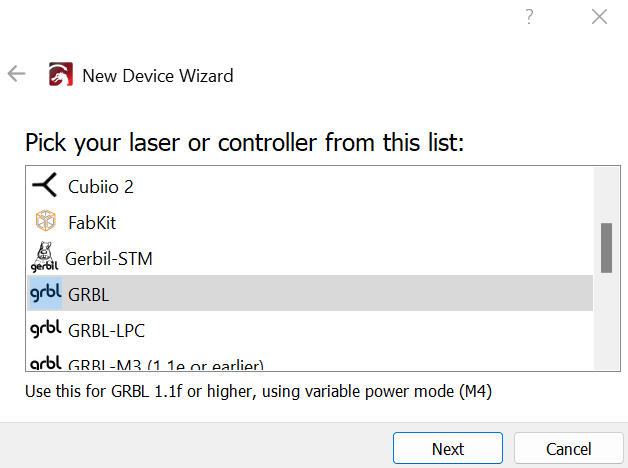
3. Select GRBL form the list, then click "Next" button

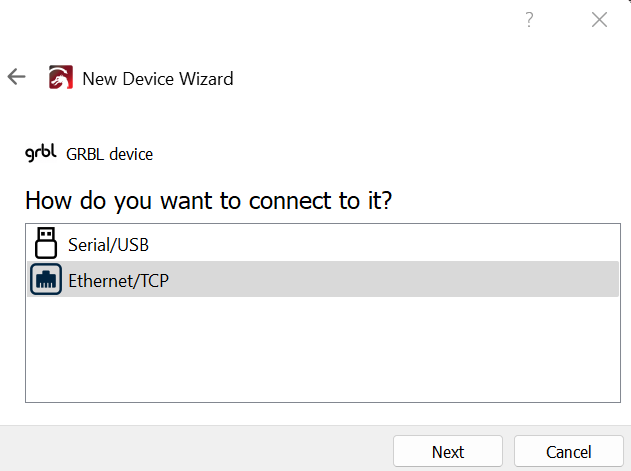
4. Select Ethernet/TCP and press "Next" button

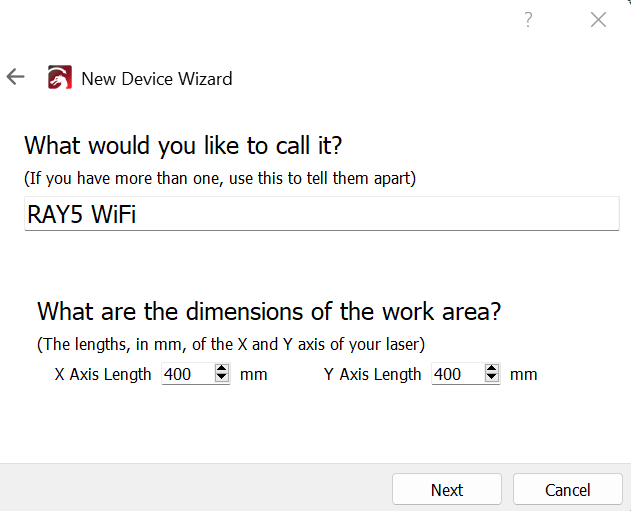
5. Enter the following data - Name: RAY5 WiFi / X = 400 / Y = 400

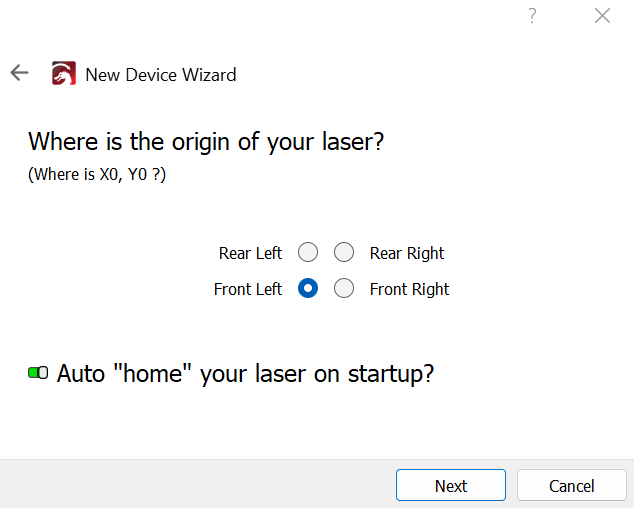
6. Select "Front Left" as your Origin and activate "Auto Home", then click "Next" button

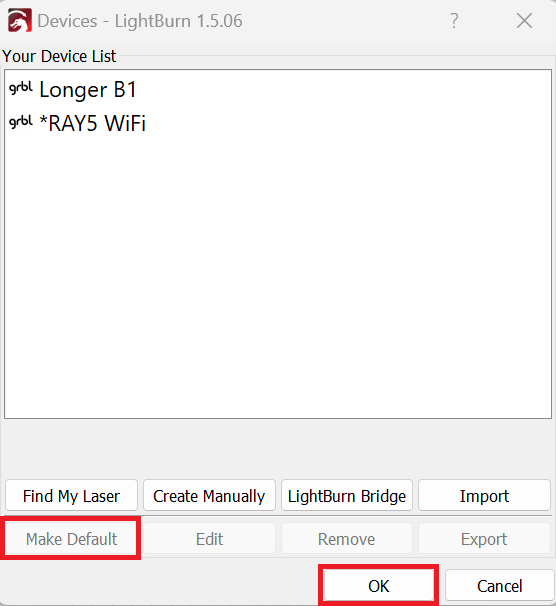
7. In the next window, press "Finish" to complete the setup, then select "RAY5 WiFi" and press "Make Default". Your RAY5 is ready to be used in LightBurn software in WiFi mode

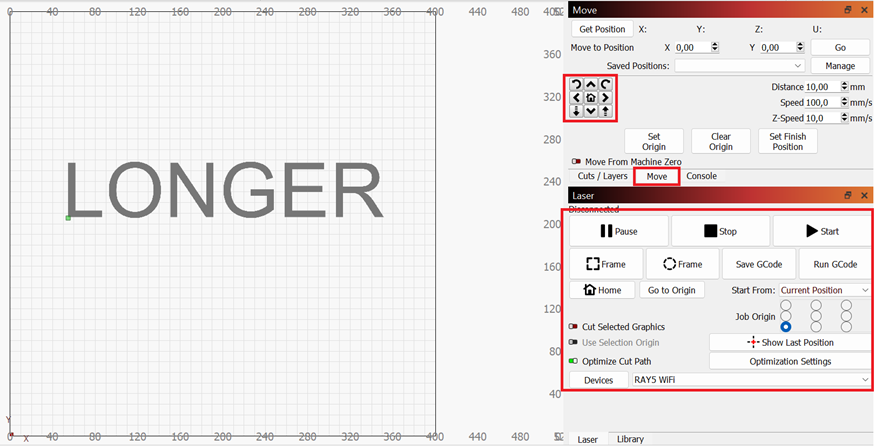
8. At this point, if everything has been done correctly, the connection status will change from "Disconnected" to "Ready", and it will be possible to move the laser module through the appropriate menu and start a laser engraving using the "Start" button, all without having to use any USB cable, but simply using the WiFi connection of your router/access point.

Please note that in order for the WiFi Bridge to work properly, both the Laptop and the Longer Ray5 must be connected to the same WiFi Router/AccessPoint.

By products-tutorial | May 14, 2024
Longer Laserburn App – Multiple Work Layer

Using LaserBurn multiple work layers is one of the easiest ways to speed up laser projects and combine different operations into one workflow. Instead of running separate engraving and cutting jobs, LaserBurn allows users to create multiple tasks inside a single project using layers.

For Longer B1 users and beginners learning laser workflows, this feature can reduce setup time, improve efficiency, and simplify project management.


Table of Contents


Quick Answer

LaserBurn multiple work layers allow you to assign different operations to different objects inside the same project. Each layer can use its own processing parameters and operation type, such as engraving or cutting, so the machine can automatically complete multiple jobs in sequence during one run. LaserBurn supports up to 10 layers.


What This Guide Covers

This tutorial explains:

  • What LaserBurn work layers do
  • How to assign multiple layers
  • How to combine engraving and cutting jobs
  • How Longer B1 processes layer-based tasks
  • Common issues and solutions
  • Helpful tips for beginners

Why LaserBurn Multiple Work Layers Matter

Laser projects often contain different operations.

For example:

  • Engraving logos
  • Cutting outlines
  • Creating text effects
  • Producing multi-color metal engravings
  • Combining decorative elements with cut shapes

Without layers, users would typically:

  1. Run engraving
  2. Stop the machine
  3. Reload files
  4. Reposition materials
  5. Run cutting

This takes more time and increases the possibility of alignment errors.

With LaserBurn multiple work layers:

  • Multiple jobs run continuously
  • Material stays in place
  • Workflow becomes easier
  • Production time decreases

LaserBurn was designed specifically for LONGER laser machines and includes integrated layer management functions.


Before You Start

Requirements

Hardware:

  • Longer B1 laser engraver
  • Compatible LONGER laser machine
  • Suitable engraving material

Software:

  • LaserBurn application
  • Existing design file or imported artwork

Knowledge:

  • Basic LaserBurn navigation
  • Understanding of engraving and cutting operations

If additional machine settings are required:

Follow official machine specifications or instructions.


Precautions

Before beginning:

  • Verify that the laser is properly focused
  • Confirm your material is secured
  • Ensure airflow or air assist functions properly
  • Double-check object placement
  • Review assigned layer settings before starting

Common beginner mistake:

Assigning multiple objects to the same layer unintentionally can apply incorrect processing parameters.


Step-by-Step: How to Use LaserBurn Multiple Work Layers

Step 1: Create or Import Images

Action:

Open the Creation menu and create or import the images you want to process.

The example workflow uses:

  • "Longer"
  • "B1"

Expected Result:

Both designs appear in the project workspace.

Important Notes:

Objects can be newly created or imported from existing files.


Step 2: Open the Layers Menu

Action:

Locate the Layers menu.

For each imported image, select a different layer.

Click different layer colors to assign unique layers.

Expected Result:

Each object changes color according to its assigned layer.

Important Notes:

Layer colors are visual indicators that help distinguish operations.

LaserBurn supports up to 10 separate layers


Step 3: Assign Processing Parameters

Action:

Set processing parameters for each layer independently.

Example:

  • "Longer" → wood engraving parameters
  • "B1" → wood cutting parameters

Expected Result:

Each layer now contains independent settings.

Important Notes:

Different layers can contain:

  • Engraving settings
  • Cutting settings
  • Speed settings
  • Power settings
  • Processing behaviors

Do not modify settings unless your material specifications require changes.

Follow official machine specifications or instructions.


Step 4: Position Material Under the Laser Module

Action:

Place the wooden panel beneath the Longer B1 laser module.

Expected Result:

Material is positioned and ready for processing.

Important Notes:

Do not move the material after setup.

Movement may affect alignment between operations.


Step 5: Start the Job

Action:

Start the created project in LaserBurn.

Expected Result:

The machine processes tasks automatically:

  1. Engraves "Longer"
  2. Cuts "B1"

The operations run continuously without interruption.

Important Notes:

The machine processes operations according to layer sequence.

Do not interrupt the machine unless necessary.


LaserBurn Multiple Work Layers for Metal Color Engraving

One useful application of multiple layers involves colored metal engraving.

Laser interaction with metal can create different visible colors depending on:

  • Laser power
  • Speed
  • Processing conditions

Multiple layers allow different settings to be applied across sections of the design.

This creates multi-tone visual effects while remaining inside a single project.

If processing metal materials:

Follow official machine specifications or instructions.


Common Problems and Solutions

Problem Requirements Solution
Objects use identical settings unexpectedly Check layer assignment Verify objects are assigned to separate layers
Design colors do not change Review Layers menu Reassign layer colors
Engraving starts but cutting does not Verify operation settings Confirm cutting parameters are assigned correctly
Alignment appears incorrect Material positioning Do not move material after setup
Wrong parameters applied Check selected layer Review settings before starting the job

Tips for Better Results

1. Use descriptive project organization

Name files clearly before saving projects.

Examples:

  • Wood_Engrave_Cut
  • Metal_Color_Test

2. Keep engraving and cutting separated

Assign different operations to different layers rather than mixing them.

This improves workflow clarity.


3. Start with simple projects

Beginners should first test:

  • Text engraving
  • Basic cutting shapes

Complex designs can be introduced later.


4. Double-check material placement

Multiple operations rely on consistent positioning.

Even small movements can affect results.


5. Preview work before processing

Review layer assignments and processing order before starting.


Frequently Asked Questions

Q: How many LaserBurn multiple work layers can be used?

A: LaserBurn supports up to 10 layers, allowing up to 10 independent jobs in one project.


Q: How do I use LaserBurn multiple work layers for beginners?

A: Create or import objects, assign different layers using layer colors, and configure parameters separately for each layer.


Q: Can engraving and cutting happen in one project?

A: Yes. LaserBurn can engrave and cut sequentially during the same process.


Q: Can I assign different parameters to each layer?

A: Yes. Each layer supports separate processing settings.


Q: Can multiple layers be used for metal engraving?

A: Yes. Multiple layers can help create varying engraving effects on metal materials.


Q: Why are all my objects using the same settings?

A: Objects may have been assigned to the same layer accidentally.


Q: Is LaserBurn available for LONGER laser machines?

A: LaserBurn is designed specifically for compatible LONGER laser engravers.


Related Tutorials

For building a complete LONGER workflow, explore:


Final Thoughts

LaserBurn multiple work layers make project creation significantly easier by combining several operations into one workflow. Instead of separating engraving and cutting into individual runs, users can create a single project and allow Longer B1 to process everything automatically.

For beginners, mastering layer management is one of the fastest ways to improve workflow efficiency and reduce project setup time. Continue exploring LONGER guides and tutorials to build more advanced engraving skills. 

By products-tutorial | May 6, 2024
Design File, Calibration and Focus to LONGER Laser engraver

LONGER laser engravers are equipped with advanced technology that enables precise cutting using focused laser beams. This process is essential in both development and production phases. To achieve effective laser cutting, it's imperative to understand key principles, select suitable materials, design appropriately, operate the machine correctly, and adhere to safety protocols. The LaserB1 and Ray5 series are highly regarded for their exceptional performance in laser cutting. Operating a LONGER laser cutting machine involves a series of important steps:
 

Design File Preparation:


Theming relies on the accuracy and replicability of the design. Whether designing in software like Illustrator or CorelDRAW, vector formats like AI or DXF are crucial for preserving geometry and dimensions. Determine cutting speed and power levels, considering material details simultaneously.
 

  • Use compatible design software such as Adobe Illustrator, CorelDRAW, or Inkscape.
  • Save files in SVG or DXF formats.
  • Develop a comprehensive design concept from sketches or design software.
  • Maintain design style and line detail integrity.
  • Utilize laser processing for color or layer applications.
  • Organize layers or groups for easy navigation.
  • Ensure fonts are in vector format for versatility.
  • Follow technical documentation for dimensions and scale.
  • Avoid confusing file structures.
  • Double-check design files for accuracy before laser processing.


Machine Calibration and Focus

Machine calibration and focus are critical aspects of ensuring optimal performance from your LONGER laser cutting machine. Before beginning any cutting operation, it's essential to calibrate the machine properly. This involves adjusting the laser beam focus and aligning the mirrors according to the LONGER's guidelines or user manual instructions. Using a focus tool to determine the focal plane and adjusting the focal point based on material type, thickness, and processing goals can help optimize cutting performance.


In addition to calibration, beam alignment is another crucial step in the setup process. Properly directing the laser beam along the intended path is essential for achieving accurate cuts. Utilizing alignment tools provided by the LONGER’s and regularly inspecting and adjusting the laser beam alignment can help maintain cutting precision over time.


Furthermore, conducting test cuts or sample runs on scraps and test materials allows you to fine-tune the focus settings and ensure the quality of the cuts. By recording the best focus setting based on the results of these test cuts, you can streamline future cutting operations and minimize material waste.


Regular maintenance and monitoring are essential for preserving the performance and longevity of your LONGER laser cutting machine. Cleaning and inspecting optical components regularly, monitoring machine performance and consistency, and following manufacturer-recommended maintenance and calibration procedures are essential practices for ensuring continued cutting precision and efficiency.

By products-tutorial | April 26, 2024
Setup LONGER Laser engraver and material selection

LONGER laser engravers employ highly accurate technology, using focused laser beams to cut various materials with precision. This process is vital in both development and production. To effectively execute laser cutting, one must understand the principles, material selection, design, machine operation, and safety measures. The LaserB1 and Ray5 series, are renowned for their performance in laser cutting. Operating a LONGER laser cutting machine involves several key steps:

Machine Setup: 
Start with put LONGER laser engraver in right place. Make sure the area can provide sufficient space for air access to the device and that it also stands on solid ground. The device can go on working at full capacity under such conditions. Attach the machine to the power source and test any fail-safe features like the emergency stop button and guard lock by pressing the emergency stop button and confirming the machine's reaction. 


The laser must be placed in an acceptable environment to reduce unintentional or unplanned disasters. The environment should be well-ventilated, stable, and clean to prevent shaking/vibration of the machine. The electrical source should be a per the maker's standards whereas it has to be earth and insulation grounded. The machine set up process should be carried out within the actual configuration of its laser beam deliver components and these components should be cleaned regularly. Software such as LaserGRBL LaserBurn LightBrun, MKS app and controls need to compatible to the operating system. First step of calibration and test of machine should be performed by adopting steps defined in machine manual.

Material Selection and Preparation: 
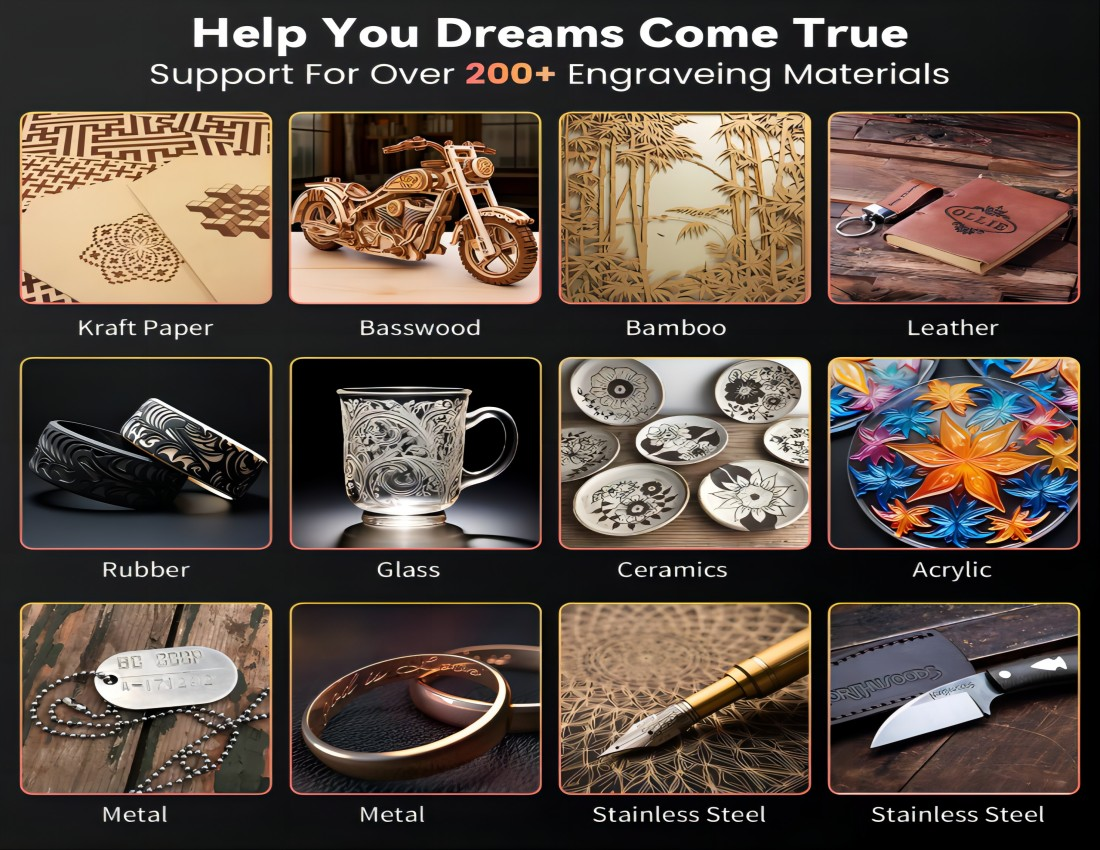
Choose the most compatible option out of many options for your laser cutting task in a proper way. The laser cutter machine (WEED) is very versatile since it can handle different materials like wood, acrylic, leather, metal, and fabric, just to name a few. The initial step involves preparing the front assembly by removing dust, smoothing out any imperfections, and securely mounting it onto the operating area board. Utilize masking tape to protect the surface and the soot from accidental damage.


The rectification of laser machining involves defining the material's characteristics, including its reaction to laser wavelength and energy level, and ensuring safety measures. Material properties like hardness, melting point, and thermal conductivity influence the process outcome. Thicker materials may require multiple passes. Proper material surface preparation, such as cleaning and degreasing, is crucial for effective laser processing. Safety considerations include adherence to laser safety protocols, the use of approved personal protective equipment (PPE), hazard awareness, and implementing ventilation or filtration systems. Refer to the LONGER laser machine's specifications, guidelines, and standards for material selection and processing operations.


By products-tutorial | April 25, 2024
The Power of Precision: Understanding the Differences Between Red and Blue Laser Engraving Machines

Red and blue lasers are two prevalent choices in the engraving machine market, each equipped with distinct laser heads. These laser heads offer unique performance characteristics and applications. By comprehending the disparities between red and blue lasers, we can make informed decisions to enhance production efficiency and quality. This article delves into the variances between red and blue laser engraving machines, using the LONGER RAY5 20W laser engraving machine and the LONGER Ruby Pulsed Infrared Laser Module as a case study.

Features of red laser engraving machine
Red light laser engraving machines usually use longer wavelength red light as the engraving light source, which has higher penetrating power and larger spot diameter. This makes it excellent at handling thicker materials such as wood, leather, and certain non-metallic materials. In addition, red light laser engraving machines also have high engraving speed and low cost, so they are popular in mass production and rapid prototyping.

Application of red laser engraving machine
LONGER Ruby PulsedInfrared Laser Module is a red laser head developed by the LONGER team. It uses advanced technology and an ultra-fine laser spot size of 0.03*0.03mm, which can easily achieve complex details down to millimeters, and can be produced on metals, plastics, etc. Perfect carving. LONGER Ruby has unparalleled engraving capabilities from metals and alloys such as iron, copper, aluminum, magnesium, zinc, gold, silver and titanium to other materials such as metal oxides, plated surfaces, ABS, inks and epoxies. When the laser engraving comes to engraving on glass, the choice of LONGER Ruby Pulsed Infrared Laser Module ensures seamless engraving without any tinting, showcasing its remarkable efficiency and speed in completing tasks while maintaining the clarity and precision of the design. Particularly suitable for scenarios requiring processing of thick materials and large-scale production, for instance, in industries like engineering and leather product manufacturing, Ruby Pulsed Infrared Laser Module offer unmatched efficiency in completing engraving tasks, thereby significantly enhancing overall production efficiency.

Features of blue laser engraving machine
Blue light laser engraving machines use shorter wavelength blue light as the engraving light source, with higher resolution and smaller spot diameter. This makes it excellent at handling thin materials such as paper, plastic and metal films. Blue light laser engraving machines also have high engraving accuracy and low heat output, so they have advantages in fine engraving and high-precision cutting.Longer's LaserB1 series and Ray5 laser engraving machines represent prime examples of blue laser engraving technology, maintaining their blue laser functionality without the need for a laser head change.

Application of blue laser engraving machine
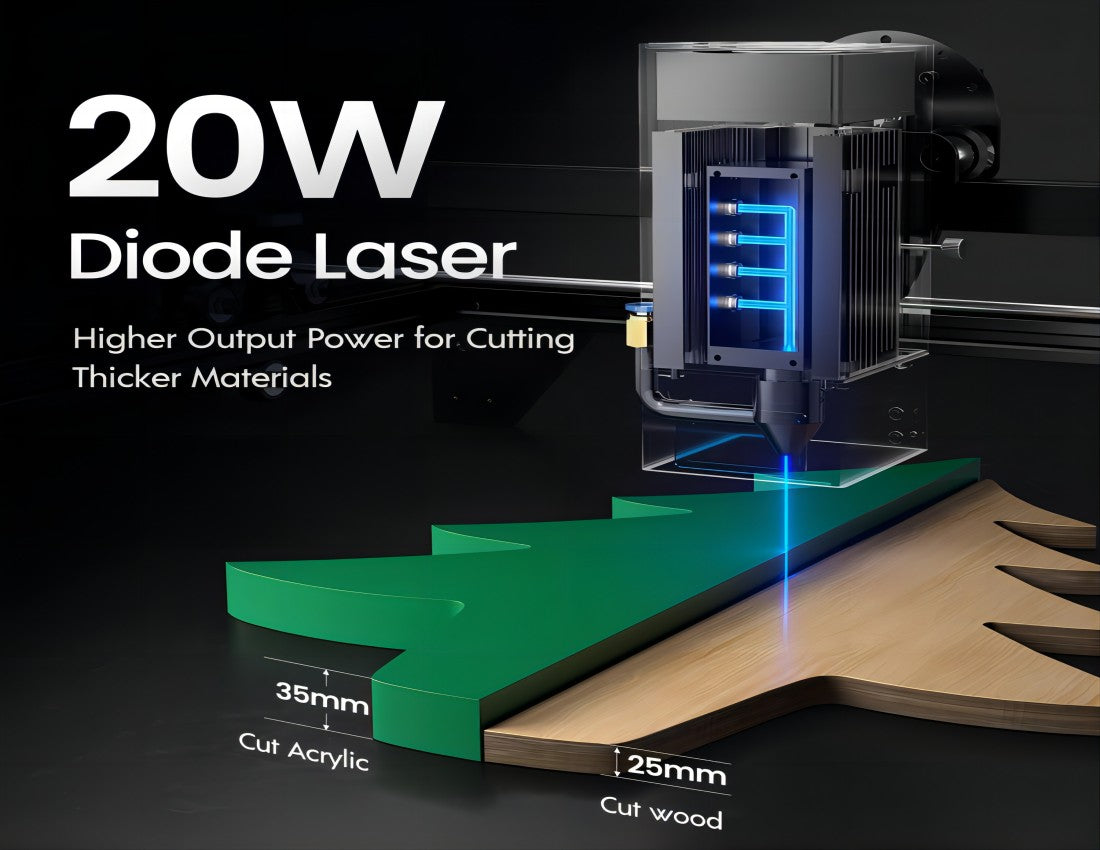
LONGER RAY5 20W  blue light laser engraving machine is a four-core diode laser with 22-24W output power and strong cutting ability. Its ultra-fine 0.08*0.1mm focus and 10000mm/min burning speed can effectively engrave on metal surfaces. Achieve multi-color engraving, and support multiple connection options, such as WIFI, APP, USB and TF card. For scenes that require fine engraving and high-precision cutting, blue-ray laser engraving machines have more advantages. They can easily achieve detailed engraving while avoiding material deformation due to high temperatures. For example, in the electronics industry, precision instrument manufacturing and other fields, blue-ray laser engraving machines can achieve high-precision engraving and cutting to meet product accuracy requirements. In addition, blue light laser engraving machines are also widely used in art production, anti-counterfeiting markings and other fields.

Conclusion

Red light and blue light laser engraving machines each have their own unique advantages and application scenarios. When choosing a laser engraving machine, creators should choose the appropriate model according to specific needs. Understanding the differences between red light and blue light is of great significance for us to choose the appropriate and accessories equipment. With 8 years of professional research in laser engraving machines, LONGER is committed to advancing the research, development, and application of laser engraving technology, delivering technological innovation and economic benefits to various industries. In the future field of laser engraving, the power of precision will continue to lead us to broader application prospects. 


By products-tutorial | April 10, 2024
Troubleshooting Common Issues with Ray5 20W Laser Cutter

The LONGER Ray5 20W laser engraving machine is a powerful and versatile tool widely used for cutting and engraving a variety of materials. However, like any precision device, users may occasionally encounter technical issues that affect performance and workflow efficiency.

Understanding how to identify and resolve these common problems is essential for maintaining consistent output quality and ensuring long-term machine stability. This guide outlines the most frequently encountered issues with the Ray5 20W and provides practical troubleshooting solutions.

Poor Cutting Precision

One of the most common issues is inaccurate or inconsistent cutting results.

Possible causes:

  • Loose belts or mechanical components
  • Improper focus adjustment
  • Incorrect machine calibration
  • Unstable working surface

Solutions:

  • Tighten belts and check all mechanical connections
  • Recalibrate the laser module and ensure proper focusing
  • Level the working bed before operation
  • Secure the material firmly to prevent movement

Maintaining mechanical stability is key to achieving precise cutting results.

Insufficient Engraving Depth

If engraving appears too light or shallow, the issue is often related to energy output or settings.

Possible causes:

  • Low laser power setting
  • Incorrect speed configuration
  • Dirty or obstructed lens

Solutions:

  • Increase laser power gradually
  • Reduce engraving speed for deeper marking
  • Clean the laser lens regularly to ensure optimal beam transmission

Proper parameter adjustment is critical for achieving consistent engraving depth.

Software Connection Issues

Connectivity problems between the laser cutter and control software can interrupt workflow.

Possible causes:

  • Faulty USB cable or connection port
  • Driver installation errors
  • Incompatible software version

Solutions:

  • Replace or reconnect USB cables
  • Reinstall device drivers
  • Ensure software is updated and compatible with the Ray5 system

Stable communication between software and hardware is essential for reliable operation.

Burn Marks or Excessive Charring

Burnt edges or excessive charring can affect the quality of finished work.

Possible causes:

  • Excessive laser power
  • Slow engraving speed
  • Poor airflow or ventilation

Solutions:

  • Reduce power settings appropriately
  • Increase engraving speed
  • Improve ventilation or use an exhaust system

Balancing power and speed is key to clean engraving results.

Lens Contamination or Degradation

A dirty or damaged lens can significantly reduce laser performance.

Possible causes:

  • Dust buildup during operation
  • Smoke residue accumulation
  • Lack of regular maintenance

Solutions:

  • Clean the lens using recommended cleaning tools
  • Inspect regularly for damage or wear
  • Replace the lens if necessary

Routine maintenance ensures long-term performance stability.

Conclusion

While the LONGER Ray5 20W laser cutter is designed for reliability and precision, proper maintenance and correct operational settings are essential for optimal performance. Most common issues can be resolved through simple adjustments, regular cleaning, and proper calibration.

By understanding these troubleshooting methods, users can minimize downtime, improve engraving quality, and ensure smooth, efficient operation across a wide range of projects.


By products-tutorial | April 9, 2024
How to operate RAY5 Laser engraving machine

LaserBurn is a powerful mobile application designed specifically for LONGER laser engraving machine users, including the Nano and B1 series. It is developed to improve both convenience and control, allowing users—whether beginners or professionals—to operate their laser engraving machines directly from a smartphone.

With LaserBurn, users can streamline workflow, reduce setup complexity, and enjoy a more flexible engraving experience without relying entirely on desktop software.

What LaserBurn Can Do

The LaserBurn app enables users to:

  • Control LONGER laser machines directly via smartphone
  • Adjust engraving and cutting parameters remotely
  • Monitor machine status in real time
  • Improve workflow efficiency for both beginners and advanced users

This mobile-first approach makes laser engraving more accessible and flexible than ever before.


STEPS Calibrating Laser
a.Place the machine on a flat table and make sure that the machine is stable and will not shake.
b.Place the wood board to be engraved or cut under the laser
c.Loosen the two thumb screws on the front of laser head by hand. Then place the focusing column vertically on the bottom of the laser head form the rear side, and manually lift the laser head so that the bottom of the rear side of the laser is close to the upper surface of the calibration column.
d.Tihten the two laser thumbscrews, then remove the focusing column


Power Up
a.Find the adapter and power cable and connect them.
b.Connect the power cord to the power supply and connect the other end of the adapter to the power port of the motherboard.
c.Connect the computer and the engraving machine through a USB computer (or insert a Micro SD card).
d.To Turn ON your RAY5 by press the power switch (To Turn OFF your RAY5 by press the power switch once again.)
Touch Screen Operation
RAY5 has a full-color 3.5-inch touch screen with a user-friendly user interface. Engraving and cutting work can be operated with touch screen and SD card.


Alt image
Wi-Fi Control operation
Enter the IP address in the browser of mobile phone or computer, then the control interface will pop up
Alt image


LaserGRBL Software Operation and SetupLaserGRBL is an easy-to-use and fully free software for laser engraver only running on Windows.
a.Find LaserGRBL software in attached SD card(path:/software),Or download from the link: https://lasergrbl.com/download/
b.After installing laserGRBL, power up the RAY5, press the power switch button, and connect the laser engraver and computer via USB cable.
c.Open LaserGRBL, select correct port(depend on your PC), baud rate: 115200. Then click connect button.(If you cannot find correct port, please install CH340 driver manually by click Menu >> Tools >> Install CH340 Driver in LaserGRBL)
Usage1.Main Interface
Alt image


2.Open file and set parameters
Alt image


Alt image


3.Start to engrave
Place a board under the laser, then calibrate the laser.
Move the laser head to the place you want.
Click “Frame” button to check the work frame.
Click button to start engraving.
Alt image


Or you can save gcode file to SD card by click “File” >> “Quick Save” for offline workingMore help information about LaserGRBL, please refer to the link: https://lasergrbl.com/usage/
Alt image


LightBurn Software Operation and setupLightBurn is a professional software for engraver, a charging software running on Windows, macOS, and Linux. It provides a trial period. You could pay for it afterward if you like it.
a.Find Lightburn software in SD card(path: /software) came with the package. Or just download from the link:https://lightburnsoftware.com/download/
b.After installing Lightburn, power up the RAY5, press the Power Switch button, and connect the laser engraver and computer via USB cable.
c.For the first time launching LightBurn, it will prompt a “New Device Wizard” for help you setup machine.
d.Select GRBL form the list, then click “Next” button
Alt image


e.Select Serial/USB and press “Next” button.


Alt image


f.Fill your Device Name, X, Y axis, then click “Enter” button
Name: RAY5
X = 400
Y = 400
g.Select “Front Left” as your Origin X,Y and activate “Auto ‘Home’”, then click “Next” button.
Alt image


h.Select RAY5 and press Make Default. Your RAY5 is ready to be used in LightBurn software.
Main interface
Alt image


Select correct port(depends on your PC), then the RAY5 is connected to the computer.
Alt image


Click Menu “File” >> “Import image from disk.” Or just use draw tool on left column to design your own pattern
Alt image


Set the name, speed, maximum power, mode, and other parameters in the cutting/layer; (engraving function and cutting function are only different in speed, power. Normally, the cutting speed parameter is slower)
Alt image


After placing the board under the laser, click Frame to check the laser path whether is completely inside of the board.
Click “Start” to start to work.
Or you can save gcode file to SD card by click “Save GCode” button in Laser panel for offline working
Alt image


More help information about lightburn, please refer to the link: https://lightburnsoftware.com/pages/tutorials
APP Operation
RAY5 can be controlled or engraved through MKSLaser APP when the engraver and APP are connected to the same WIFI.
Please search for "MKSLaser" in Google play or app store or visit the address below to download Android system https://play.google.com/store/apps/details?id=makerbase.com.mks laser
Please search for "MKSLaser" in the app store or visit the address below to download https://apps.apple.com/us/app/mkslaser/id1542756280?uo=4&at= 11l6hc&app=itunes&ct=fnd for Apple system
Alt image

LaserBurn significantly improves the usability and accessibility of LONGER laser engraving machines by bringing core controls directly to mobile devices. Combined with traditional software options like LaserGRBL and LightBurn, users can choose the most suitable workflow for their skill level and project requirements.

Whether you are a beginner exploring laser engraving or a professional managing detailed production work, LaserBurn provides a more intuitive and efficient way to operate LONGER machines.

By products-tutorial | April 7, 2024
Tips for engraving glass using laser engraving machine

Laser engraving on glass using diode technology is a versatile craft that finds its place in contemporary artistry and manufacturing. In the realm of art creation, this technique empowers artists to intricately etch stunning patterns, text, and textures onto glass surfaces, crafting exquisite sculptures, decorative pieces, and more. Similarly, diode laser engraving is a staple in manufacturing, facilitating the production of ornaments, accessories, and personalized gifts with unparalleled precision and customization options, meeting the demand for top-quality craft products in the market.

Longer's diode laser engraving serves as an efficient solution for personalized engraving services, offering tailored options for souvenirs, trophies, and keepsakes from 2016. In architecture, Longer lends itself to the decoration and customization of glass elements in buildings, infusing spaces with unique artistic flair and bespoke designs. With its attributes including precision, automation, versatility in achieving various effects, and the ability to maintain glass surface smoothness, diode laser engraving emerges as a pivotal technology in glass processing and decoration, unlocking endless creative and manufacturing opportunities for creators and businesses alike.


Tip 1: Clean the Glass Surface Before Engraving

Cleaning the glass surface is a crucial first step before engraving. It not only helps ensure the accuracy and quality of the engraving but also prevents adverse effects during the process. Cleaning removes dirt, grease, and other impurities from the surface, ensuring that the laser can accurately irradiate the glass. Additionally, a clean glass surface aids in the uniform propagation of laser energy, avoiding excessive local heat that may cause glass breakage or uneven engraving effects. Therefore, it is essential to thoroughly clean the glass surface before engraving, using ethanol and a lint-free cloth to wipe it clean.

Tip 2: Apply Paint to the Engraved Glass Surface

Applying paint to the glass surface during engraving is a critical technique. By applying acrylic paint, the refraction of the laser is reduced, allowing the glass to absorb energy more fully and maintain stability during laser engraving. Additionally, spraying black paint or adhering colored paper is also a common method.

Tip 3: Clean the Engraved Glass Product

After waiting for the laser engraving to complete and cool down, use an appropriate solvent or cleaner (such as acetone, alcohol, or paint remover) to spray or apply it to the painted areas. These chemicals can typically dissolve the paint, making it softer and easier to remove. After spraying, gently wipe the painted areas with a soft cloth.

The above tips provide key techniques for achieving laser engraving on glass materials. LONGER is definitely a great helper for making glass decorations. Currently, the RAY5 and Laser B1 series machines have been released. The RAY5 series engraving machine is equipped with a 0.08*0.08mm compressed laser spot, which focuses energy more, perfectly combining simplicity with precision, making it an ideal choice for beginners entering the world of engraving and cutting. Meanwhile, the Laser B1 series machine boasts a engraving speed of up to 36000mm/min, standing out with its powerful functionality, meeting the needs of experienced creators proficient in engraving and cutting techniques.

Explore Ray5 20W at https://www.longer3d.com/products/ray5-20w-laser-engraver and Laser B1 30W https://www.longer3d.com/products/longer-laser-b1-30w-laser-engraver to learn more and elevate your glass engraving journey with Longer.

By products-tutorial | April 7, 2024
LONGER LaserBurn: Ideal companion for your laser engraving machine

LaserBurn Is a powerful APP designed for LONGER laser engraving machine users, designed for Nano and B1 series laser engraving machines, designed to enhance the user engraving experience and convenience. Both novice and professional, LaserBurn meets the needs of users to control laser engraving machines through mobile phones.

LaserBurn APP Users can directly control their own LONGER laser engraving machine from their smartphones, so what specifically can LaserBurn provide more convenient access and operation for the use of Longer Nano? Let me briefly introduce the steps to use LaserBurn APP:


Download and install the LaserBurnAPP:

To use LaserBurn, download the app. iOS users can search and download and install the LaserBurn app in App Store, while Android users can access and install the app in the Google Play store.

Connect the laser engraving:

Open the LaserBurn app and follow the app's instructions to connect the laser engraving machine to your smartphone. There are three ways to connect the device:

WiFi Direct connection: Turn on the long B1 power supply and connect the phone to a Wi-Fi network with the name " LongerLaser_. Wi-Fi password: 12345678. Open the Longer Laserburn app, click Unconnected, device management, and then enter the IP address 192.168.0.1 to connect to the app.

Scan Connection: Open the LaserBurn application, click Unconnected, and then click Add to scan and add the device. First, connect your phone to a Wi-Fi network called "LongerLaser_."Wi-Fi password: 12345678. Click the Set STA Mode, select the Wi-Fi network that you need to connect to, and establish a connection.

IP connection :touch screen users only.

Drawing creation:

LaserBurn The app has a powerful drawing tool built-in, allowing you to easily create your own designed patterns on your phone. In addition, you can import files from the SD card or carve material from the library.

Adjust the engraving parameters:

Users can preview the engraving effect in real time in the application and customize the engraving parameters as needed to achieve personalized engraving effects. Here are the carving and cutting parameters of some materials:

Carving parameters:

Tden wood: 10000; 80, hardwood: 10000; 100, alumina: 100; 100, leather: 24000; 35, denim: 11000; 25, wood: 15000; 90, pottery: 2000; 100, rock: 14000; 100, stainless steel: 1000; 100, paper: 6000; 15.

Cutting parameters:

Linden wood 3mm: 300; 100, linden wood 5 mmm: 150; 100, bubble tung wood 8mm: 50; 100, leather: 1300; 100, denim: 600; 100, paper: 3000; 100.

Start carving:

After the adjustment parameters are completed, the carved items are placed, and the APP application enters the preview mode, and the bracket height is adjusted. When the two laser points are combined into a focus point, the carving can begin. 

Overall, by using the LaserBurn APP, you can easily control the LONGER Nano and B1 series of laser engraving machines, achieving accurate engraving operation, and obtaining an efficient workflow. Download the LaserBurn APP now and start experiencing the unparalleled laser engraving experience! Click here to learn more on Longer official website.

By products-tutorial | March 29, 2024