


Products
Trending searches
Popular products

BLTouch for LK1/LK4/LK4 PRO/LK5 PRO Leveling
Introduction
This article is to help the LONGER LK and LK Pro series 3D printer users who want to upgrade with auto bed leveling sensor, like BL-TOUCH, etc. More information about senor please refer to the sensor datasheet.

Preparation
- LONGER FDM 3D Printer LK or LK Pro series
- BL-TOUCH or other similar sensor
- Sensor-attached wires (5 pin)
- Sensor-attached screws and nuts(2 pairs)
- Sensor mount (printed .stl model)
- USB cable
- Pronterface or other serial port communication software
- 50k ohm or 100k ohm resistor (LKx series users only)
-

Wiring
- Switch-off the printer power.
- Find the position of the motherboard, then screw down the motherboardcover.
- Unplug the Z-MIN wire (2-pin) in the board.
- 4. Hook up the sensor and the motherboard. LKx series users need to parallel a 50 or 100 kOhmresistor between 5V pin and PWM pin, as the picture showing below
- Screw up the motherboard cover.
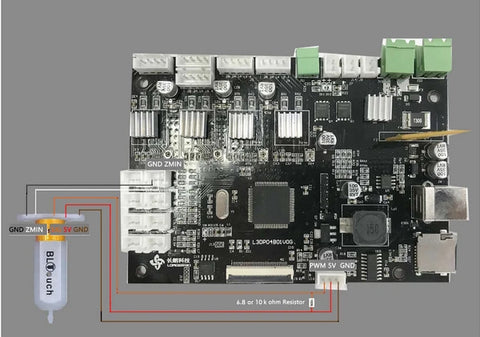
LKx series board wiring need extra resistor

LKx Pro series board wiring
Mounting
- Remove the Z-axis end stop switch as picture showing below

Remove the z min end stop switch
2. Screw down the left 2 screws of head module
3. Mount BL-TOUCH as picture showing below

Mount sensor
Power on
- Confirm BL-TOUCH wiring and mounting are complete.
- Switch on the printer power
- Connect the PC and printer with a USB cable.
- Flash BL-TOUCH dedicated firmware . Check the firmware update manual if you need it.
- Open pronterface software, and select the serial port (115200 baud rate). and connect to printer
Adjusting z-offset
- Clean up bed and nozzle, and ensure no materials stick on
- Send M851 Z0 to reset Z offset value.
- Send G28 to homing XYZ axis
- Send G1 F60 Z0 to lower Z axis to the software origin.
- Send M211 S0 to inactivate software endstop function
- Place a sheet of paper (or other block of 0.10 mm approximately) on the bed and use the pronterface to lower the nozzle 1mm by 1mm then 0.1mm by 0.1mm until you feel a friction on the sheet of paper (the paper is not to be jammed but not too free either). Then remove the sheet.
- Send M114 to get the current Z height value (usually negative). The value is the z-offset we need.
- Send M851 Z x.x to set z-offset (x.x is the value of previous value)
- Send M500 to save current settings.
- 10. Send M211 S1 to reactivate software endstop function.
- Send G28 Z0 to home the Z axis
- 12. Send G1 F60 Z0 to test if the Z axis could go back to the actual Z origin by checking the clearance between the bed and the nozzle if it is about 0.1 mm (the thickness of a sheet of paper). If not, please repeat steps 1 to 11.
Adjusting auto leveling
1. Send G28 to home the XYZ axis.
2. Send G29, and wait for the bed tilt measurement to complete.
3. Send M500 to save measurement values of the previous step.
4. Send M420 S1 to activate the auto-leveling function.
Replace GCODE
- Replace with new START GCODE(in appendix section) in your slicer software (Cura, Slic3r, Simplify3D, )
- Have fun! :)
Appendix
-- BL-TOUCH START GCODE --
G21 ; metric values
G90 ; absolute positioning
M82 ; set extruder to absolute mode
M107 ; start with the fan off
; confirm BL-touch safety
M280 P0 S160 ; BL-Touch Alarm release
G4 P100 ; Delay for BL-Touch homing
G28 X0 Y0 ; move X/Y to min endstops
G28 Z0 ; move Z to min endstops
; reconfirm BL-touch safety
M280 P0 S160 ; BL-Touch Alarm realease
G4 P100 ; Delay for BL-Touch
; bed leveling
G29; Auto leveling
M420 Z5 ; set LEVELING_FADE_HEIGHT
M500 ; save data of G29 and M420
M420 S1 ; enable bed leveling
; prepare hot-end
G92 E0 ; Reset Extruder
G1 Z2.0 F3000 ; Move Z Axis up little to prevent scratching of Heat Bed
G1 X0.1 Y20 Z0.3 F5000.0 ; Move to start position
G1 X0.1 Y150.0 Z0.3 F1500.0 E15 ; Draw the first line
G1 X0.4 Y150.0 Z0.3 F5000.0 ; Move to side a little
G1 X0.4 Y20 Z0.3 F1500.0 E30 ; Draw the second line
G92 E0 ; Reset Extruder
G1 Z2.0 F3000 ; Move Z Axis up little to prevent scratching of Heat Bed
G1 X5 Y20 Z0.3 F5000.0 ; Move over to prevent blob squish
; -- end of BL-TOUCH START GCODE --
Files Download:
PC Software: >>pronterface-windows<<
Mounted Bracket: >>Bracket<<
The firmware has been codeed by LONGER, you would download the firmware and upgrade directly:
>>For LK1(U20)<<
>>For LK4(U30)<<
>>For LK5 PRO<<
If you have installed dual blower kit, use the dual blower kit Mounted Bracket: >>Bracket<<, and download the below firmware and upgrade directly:
>>For LK1(U20)<<
>>For LK1 Plus(U20 Plus)<<
>>For LK4(U30)<<
>>For LK4 PRO(U30 Pro)<<
>>For LK5 PRO<<
If there's any question or need for assistance from us on the upgrade, please feel free to contact us at support@longer3d.com, LONGER support team will follow up and reply you ASAP.
Thanks.
- Choosing a selection results in a full page refresh.
!