First of all
LONGER LK5 PRO firmware download: https://drive.google.com/drive/folders/1xvMYLhAvwqhYiqoT559U8gBzruGjQ_AE?usp=sharing
1. About LK5 PRO install steps
If you find it lost, please contact our technical team at support@longer.net; after confirmation, we will resend the new part to you.
We make video tutorials about installation steps; please follow:
https://www.youtube.com/watch?v=F_VzVxOhHSo

2. First turn on
The touch screen is not bright
Confirm whether the input voltage range of the switching power supply is consistent with the electricity voltage in the area and the screen cable is connected.
If still does not work, check the power indicator and the mainboard indicator (method: remove the bottom mainboard protective cover; refer to the video in the link below.)
https://www.youtube.com/watch?v=K8Jwu-faDfQ
Fan noise and abnormal sound.
Make sure that the fan blades are not damaged and that there are no foreign objects. You can email fan photos to support@longer.net help you confirm.
3. Leveling bed
The distance between the hot end nozzle and the hot bed is 0.1-0.2 mm. follow below video leveling bed: https://www.youtube.com/watch?v=TJ0MOFPuOTQ. If it still can't be solved, put the hot bed glass and aluminum substrate on a flat table to check whether there is bending, if the bed bending, contact LONGER 3D technical team: support@longer.net
4. Zeroing failed
Failed to return to zero/abnormal noise of return to zero/impact limit still does not stop motion. Please check whether the limit switch is complete and the installation condition, and follow the video: https://www.youtube.com/watch?v=m3sQGZVFDqY., check the cable installation condition.
About the Z-axis limit switch height adjustment, refer to the video in the link below.
https://youtu.be/F_VzVxOhHSo?t=255
5. Load/unload filament
Error8
Check the real-time hot-end temperature display on the screen. If it is negative, check the installation of the thermistor plug; make sure it is installed as below:

If anything good about thermistor, that is hot end issue, in this case we should follow the below video to change hot end: https://www.youtube.com/watch?v=RwpLTFwFzAg
Error0 or Error12
Check the installation of the hot-end thermistor and the plug of the hot-end heating rod.
If the installation is normal, the cable may be broken. Replace the hot end;
The extruder is not working
-
Check the installation of the extruder cable plug (E refers to the extruder).
2. The extruder defaults to work after reaching the hot end set temperature (minimum 195 degrees). If it still cannot work, check the installation of the extruder motor wire.
3. If it still can't work, exchange the X and E motor wire plugs, control the movement respectively, and report the situation to the after-sale service.
Filament cannot be extruded
When, without loading the filament, the extruder works fine, this situation is a hot end block. When the filament is not loaded, the extruder works abnormally; please contact the after-sales service directly support@longer.net
Nozzle smoking
Check the thermistor is completely detached or loosely installed (check when cooling); reinstall it.
6. Start printing
If LK5 PRO printer does not recognize the Micro SD card file
Use a tool to format the Micro SD card and reload the file.
Micro SD Card Formatting Software
https://drive.google.com/drive/folders/1TgCT1CBsjI4-7prSu1nEUXxQ6vhsJzms?usp=sharing
Micro SD card preload file download address
https://drive.google.com/drive/folders/1zz5mlLMBoa3DguuyG6YDHJJXnhL-XKnJ?usp=sharing
Dip the SD card in alcohol, pull out and insert it into the SD card slot several times. Wait for the alcohol to evaporate completely, and restart the machine to check whether it works again.
If still not work, contact LONGER 3D technical team: support@longer.net
Newly added files not recognized
LONGER LK5 PRO recognizes the Gcode file in the root directory of the Micro SD card and checks the format of the newly added file.
P.S. Gcode files can be generated by slicing software.
If still not work, contact LONGER 3D technical team: support@longer.net.
Error 9
Check that the touch screen displays the real-time hotbed temperature, and if it is negative, check the installation of the hotbed cable plug.
The cable is installed normally. Use a multimeter to check the resistance of the aluminum substrate.
video about measure the resistance of the hot bed socket: https://www.youtube.com/watch?v=yFV3JCilzA8
If still not work, contact LONGER 3D technical team: support@longer.net
Error 1/13
Check the heatbedcable plug installation.
Check the resistance of the aluminum substrate. If it is normal, replace the cable for testing. If the cable is still abnormal, contact LONGER 3D technical team: support@longer3d.com
The print size is too small
Check the computer slicing software to set the print format.
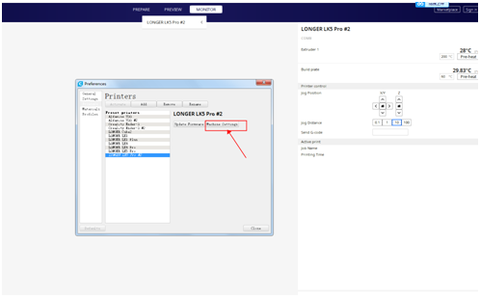
If this does not resolve, check the printer firmware information.
PS: LK5 Pro firmware and update guide files can be downloaded at the link:
https://drive.google.com/file/d/1rRos32XckF5ZlI5tYlCTlyt22E_BlQXP/view?usp=sharing.
LONGER LK5 PRO 3D printer firmware upgrade in this article:
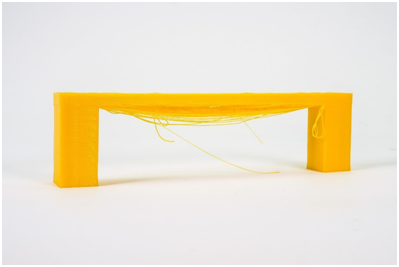
https://www.longer3d.com/blogs/academy/longer-lk5-pro-full-use-tutorial Filament not sticking to platform
Check whether the slicing software parameters are the default parameters of the Cura Longer machine, and try to relevel (the proper distance between the nozzle and the printing bed is the thickness of a sheet of A4 paper). For leveling the bed, check the video in the link below.
https://www.youtube.com/watch?v=TJ0MOFPuOTQ
After leveling bed, add "ralf" while slicing the model
If still not work, please check, Check if the heat bed is bent in 3, Leveling bed
Filament not extruded
1. When the motor shaft of the extruder rotates, the engagement gear does not rotate; install the engagement gear fixing screw.
2. If the extruder does not work, switch the motor test; refer to the video.
https://www.youtube.com/watch?v=XCjrieoyZ1c
3. If the distance between the hot end nozzle and the hot bed is too close, relevel it.
4. If the hot end is blocked, replace the hot end. Refer to 5.4 for the inspection method.
7. Other issue
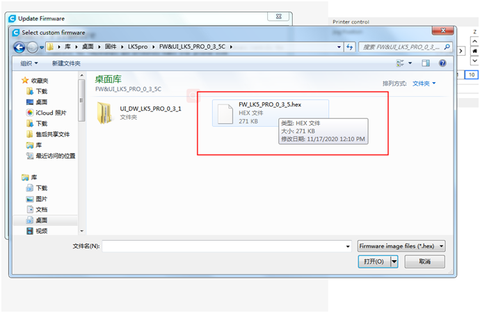
Wrong firmware
Download the LK5 Pro firmware and update the guide file and update the firmware:
https://drive.google.com/file/d/1rRos32XckF5ZlI5tYlCTlyt22E_BlQXP/view?usp=sharing
Refer to 6.5.
During the printing process
If the power input is normal, it still display "Resume printing." In this situation, please update the firmware to the Marlin 2.0 version. the following is the firmware download link:
https://drive.google.com/file/d/10mY1k7CIIJYEa2HbqzdXNSre7h4x6Zfa/view?usp=sharing
Refer to the link below for the firmware update tutorial.
https://www.longer3d.com/blogs/academy/longer-lk5-pro-full-use-tutorial
After updating the firmware, the problem still cannot be solved; contact LONGER 3D technical team at support@longer.net
bending, After the printer turned on, the touch screen is stuck on the boot page, and the firmware cannot be loaded, please confirm the touch screen cable is connected situation, if cable not issue, please contact LONGER 3D technical team: support@longer.net